eyedoctodd
Well-Known Member
This topic has been covered before, a couple of different ways but I think I've refined it to make it cheaper, easier and better.
Credit where credit is due: My first beer line cleaner was the exact setup in this thread. However, it was a pain to pump constantly, refilling the sprayer, draining, YAWN... Then I got the idea for continuous recirculation from homebrewfinds. However, I think that build is unnecessarily complex and expensive. My adaptation follows:
We start with a corny keg liquid post from your choice of vendor (or just borrow one from a spare keg you have laying around.) I used the one I had bought when I made the pump sprayer listed above. These connect to a 3/8" male flare thread (use teflon thread tape).

Then you will get this 3/8" male flare to 3/8 MPT elbow (an elbow allows you to rotate your connection for easier direction than a straight connection. I bought mine from Sears Hardware for $1.79

Then add this 3/8" FPT to 3/8" hose barb adapter. (ditto as to source, cost $1.89)

Buy this cheap-ass ($6.99) 158 GPM pond pump from harbor freight. This pump has 5/16" or 1/2" outlet sizes. If you want to pay more for higher GPM if you have super-long lines with higher resistance, go for it. I have 6 or 7 foot lines and you can see my flow speed below. *OTHER PUMPS MAY WORK but I put this package together based on the outlet size on the pump. Vary from this with consideration as to your hose barb size on the adapter listed above.*
You will need about 2 inches of 3/8" ID hose (braided vinyl, high temp hose - doesn't matter. I bought a foot of braided hose before I realized I had some leftover from my cooler mash tun conversion)

You will also need about 1/2 inch length of 5/16" ID x 7/16" vinyl tubing standard racking tubing)

The reason you need that 1/2 inch length of tubing is that you can use it to 'bridge' the diameter gap between the 3/8" barb and the 5/16 pump outlet. First put the stub of 5/16" tubing on the pump outlet. Then, heat up the 3/8 tubing (for pliability) in some boiled water and force that ***** over the 5/16 tubing that is already on the pump outlet. I found I did not need hose clamps on either end of the 3/8" tubing. Maybe if it stretches over time, I will have to replace or clamp the 2 inches of hose.
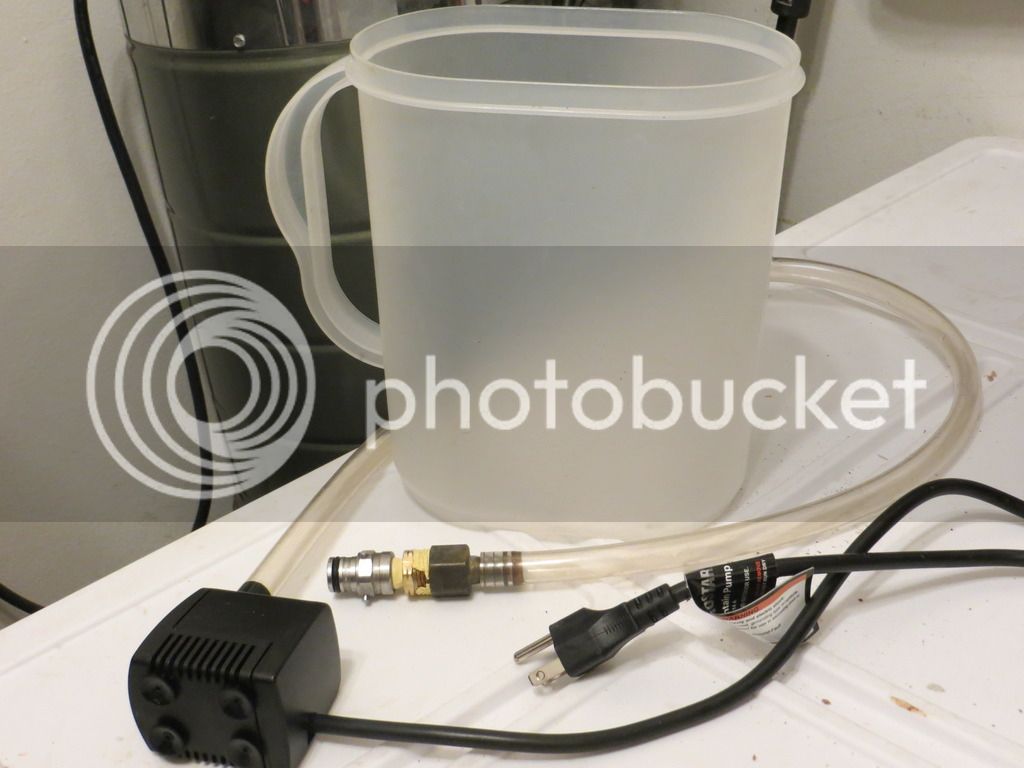
Here is the finished build:

OPTIONAL - a standard barbed corny keg liquid disconnect. I had several left over after upgrading all of my 7 taps to the threaded 1/4" flare connection type disconnects. The reason to use one is to help with quickly priming the pump. Just connect your spare liquid disconnect and rotate it so the barb is pointing down into your reservoir (I use a 2-quart pyrex measuring cup since I can throw an ounce of BLC in there and be very close to the awkward 2/5 ounce per quart recommended BLC dilution) and run your pump for a few seconds to prime the pump.
Then turn off the pump and swap this spare disconnect for the beer line you want to clean. Don't forget to open the faucet for the line you're cleaning so it drains into the BLC reservoir.
Video below shows it in use. I went away and left it for about 15 mins: slight foam but no mess and CLEAN BEER LINES!
video
Plug in and recirculate BLC for a while, then dump and repeat with rinse water and/or Sani-clean (for lower foaming versus star-san.)
Enjoy!
My cost was
6.99 pump
1.79 elbow
1.89 adapter
The rest I had laying around.
The build over at Homebrewfinds runs $34.83 (not counting the things I left out of my total above because I already had them. Just trying to be fair.)
Credit where credit is due: My first beer line cleaner was the exact setup in this thread. However, it was a pain to pump constantly, refilling the sprayer, draining, YAWN... Then I got the idea for continuous recirculation from homebrewfinds. However, I think that build is unnecessarily complex and expensive. My adaptation follows:
We start with a corny keg liquid post from your choice of vendor (or just borrow one from a spare keg you have laying around.) I used the one I had bought when I made the pump sprayer listed above. These connect to a 3/8" male flare thread (use teflon thread tape).
Then you will get this 3/8" male flare to 3/8 MPT elbow (an elbow allows you to rotate your connection for easier direction than a straight connection. I bought mine from Sears Hardware for $1.79
Then add this 3/8" FPT to 3/8" hose barb adapter. (ditto as to source, cost $1.89)
Buy this cheap-ass ($6.99) 158 GPM pond pump from harbor freight. This pump has 5/16" or 1/2" outlet sizes. If you want to pay more for higher GPM if you have super-long lines with higher resistance, go for it. I have 6 or 7 foot lines and you can see my flow speed below. *OTHER PUMPS MAY WORK but I put this package together based on the outlet size on the pump. Vary from this with consideration as to your hose barb size on the adapter listed above.*
You will need about 2 inches of 3/8" ID hose (braided vinyl, high temp hose - doesn't matter. I bought a foot of braided hose before I realized I had some leftover from my cooler mash tun conversion)
You will also need about 1/2 inch length of 5/16" ID x 7/16" vinyl tubing standard racking tubing)
The reason you need that 1/2 inch length of tubing is that you can use it to 'bridge' the diameter gap between the 3/8" barb and the 5/16 pump outlet. First put the stub of 5/16" tubing on the pump outlet. Then, heat up the 3/8 tubing (for pliability) in some boiled water and force that ***** over the 5/16 tubing that is already on the pump outlet. I found I did not need hose clamps on either end of the 3/8" tubing. Maybe if it stretches over time, I will have to replace or clamp the 2 inches of hose.
Here is the finished build:
OPTIONAL - a standard barbed corny keg liquid disconnect. I had several left over after upgrading all of my 7 taps to the threaded 1/4" flare connection type disconnects. The reason to use one is to help with quickly priming the pump. Just connect your spare liquid disconnect and rotate it so the barb is pointing down into your reservoir (I use a 2-quart pyrex measuring cup since I can throw an ounce of BLC in there and be very close to the awkward 2/5 ounce per quart recommended BLC dilution) and run your pump for a few seconds to prime the pump.
Then turn off the pump and swap this spare disconnect for the beer line you want to clean. Don't forget to open the faucet for the line you're cleaning so it drains into the BLC reservoir.
Video below shows it in use. I went away and left it for about 15 mins: slight foam but no mess and CLEAN BEER LINES!
video
Plug in and recirculate BLC for a while, then dump and repeat with rinse water and/or Sani-clean (for lower foaming versus star-san.)
Enjoy!
My cost was
6.99 pump
1.79 elbow
1.89 adapter
The rest I had laying around.
The build over at Homebrewfinds runs $34.83 (not counting the things I left out of my total above because I already had them. Just trying to be fair.)