You are using an out of date browser. It may not display this or other websites correctly.
You should upgrade or use an alternative browser.
You should upgrade or use an alternative browser.
Show us your DIY stir plate!
- Thread starter DeBrewer
- Start date

Help Support Homebrew Talk - Beer, Wine, Mead, & Cider Brewing Discussion Forum:
This site may earn a commission from merchant affiliate
links, including eBay, Amazon, and others.

pumpkinman2012
Well-Known Member
- Joined
- Jan 7, 2013
- Messages
- 1,104
- Reaction score
- 149
I tried the "east" route by using a PC power supply that I had laying around, magnet from an old hard drive and the stir bar from the Vinmetrica SC300 unit that I have.
The fan on the power supply spins without issue, but when I tested using a 1000 Ml flask and the small stir bar, the stir bar sticks to the magnet and doesn't move at all.
I believe that it may just be an issue to a stir bar that is too small for the powerful magnet, but I'm hoping someone can confirm this, or at least tell me that I'm doing wrong.
I've attached a few pics, the first is the power supply with the magnet, the second is the power supply specs (don't know if that matters) and the third is the flask on the power supply.
Thanks in advance for any help.
Cheesy_Goodness
Well-Known Member
Does that metal piece in the middle spin at all?
If not that's your problem. The magnet needs to be attached to the fan so the fan can spin it (and your stir bar) around.
If not that's your problem. The magnet needs to be attached to the fan so the fan can spin it (and your stir bar) around.
pumpkinman2012
Well-Known Member
- Joined
- Jan 7, 2013
- Messages
- 1,104
- Reaction score
- 149
Yep, I didn't even think about that...DOH!...thanks for helping me get my head out of my arse!
Here is the Fixed Stir plate.
A little dye to show how it is working,
[ame="https://www.youtube.com/watch?v=o9Byk61aAVk"][YOUTUBE]o9Byk61aAVk[/YOUTUBE][/ame]


Here is the Fixed Stir plate.
A little dye to show how it is working,
[ame="https://www.youtube.com/watch?v=o9Byk61aAVk"][YOUTUBE]o9Byk61aAVk[/YOUTUBE][/ame]
Chops1867
Well-Known Member
Sprayed the top with PlastiDip. Keeps the flask from slipping. 
Sent from my iPhone using Home Brew

Sent from my iPhone using Home Brew
thepudgeman
Active Member
Here is mine.


Chops1867
Well-Known Member
Any worries about the UV from the LED affecting the starter?
Sent from my iPhone using Home Brew
Sent from my iPhone using Home Brew
Chops1867
Well-Known Member
The blue lights are cool, though!
Sent from my iPhone using Home Brew
Sent from my iPhone using Home Brew
pumpkinman2012
Well-Known Member
- Joined
- Jan 7, 2013
- Messages
- 1,104
- Reaction score
- 149
I'm going to try to find a piece of Plexiglas that is approx. 3 inches larger than my stir plate in case the yeast decides to get violent and come pouring out the top of the flask, the unit itself will not get drenched and fried.
COEBRA
Well-Known Member
- Joined
- Jan 9, 2014
- Messages
- 159
- Reaction score
- 25
Any worries about the UV from the LED affecting the starter?
Sent from my iPhone using Home Brew
What kind of effects? My starters just sit on the counter anyway. I don't think your going to "skunk" a starter...
COEBRA
Well-Known Member
- Joined
- Jan 9, 2014
- Messages
- 159
- Reaction score
- 25
Sprayed the top with PlastiDip. Keeps the flask from slipping. View attachment 196993
Sent from my iPhone using Home Brew
Nice touch! Back to THD I go lol!
KindofBlues71
Well-Known Member
- Joined
- Dec 2, 2011
- Messages
- 92
- Reaction score
- 10
Sprayed the top with PlastiDip. Keeps the flask from slipping. View attachment 196993
Sent from my iPhone using Home Brew
So simple, yet so brilliant!
Sent from my KFSOWI using Home Brew mobile app
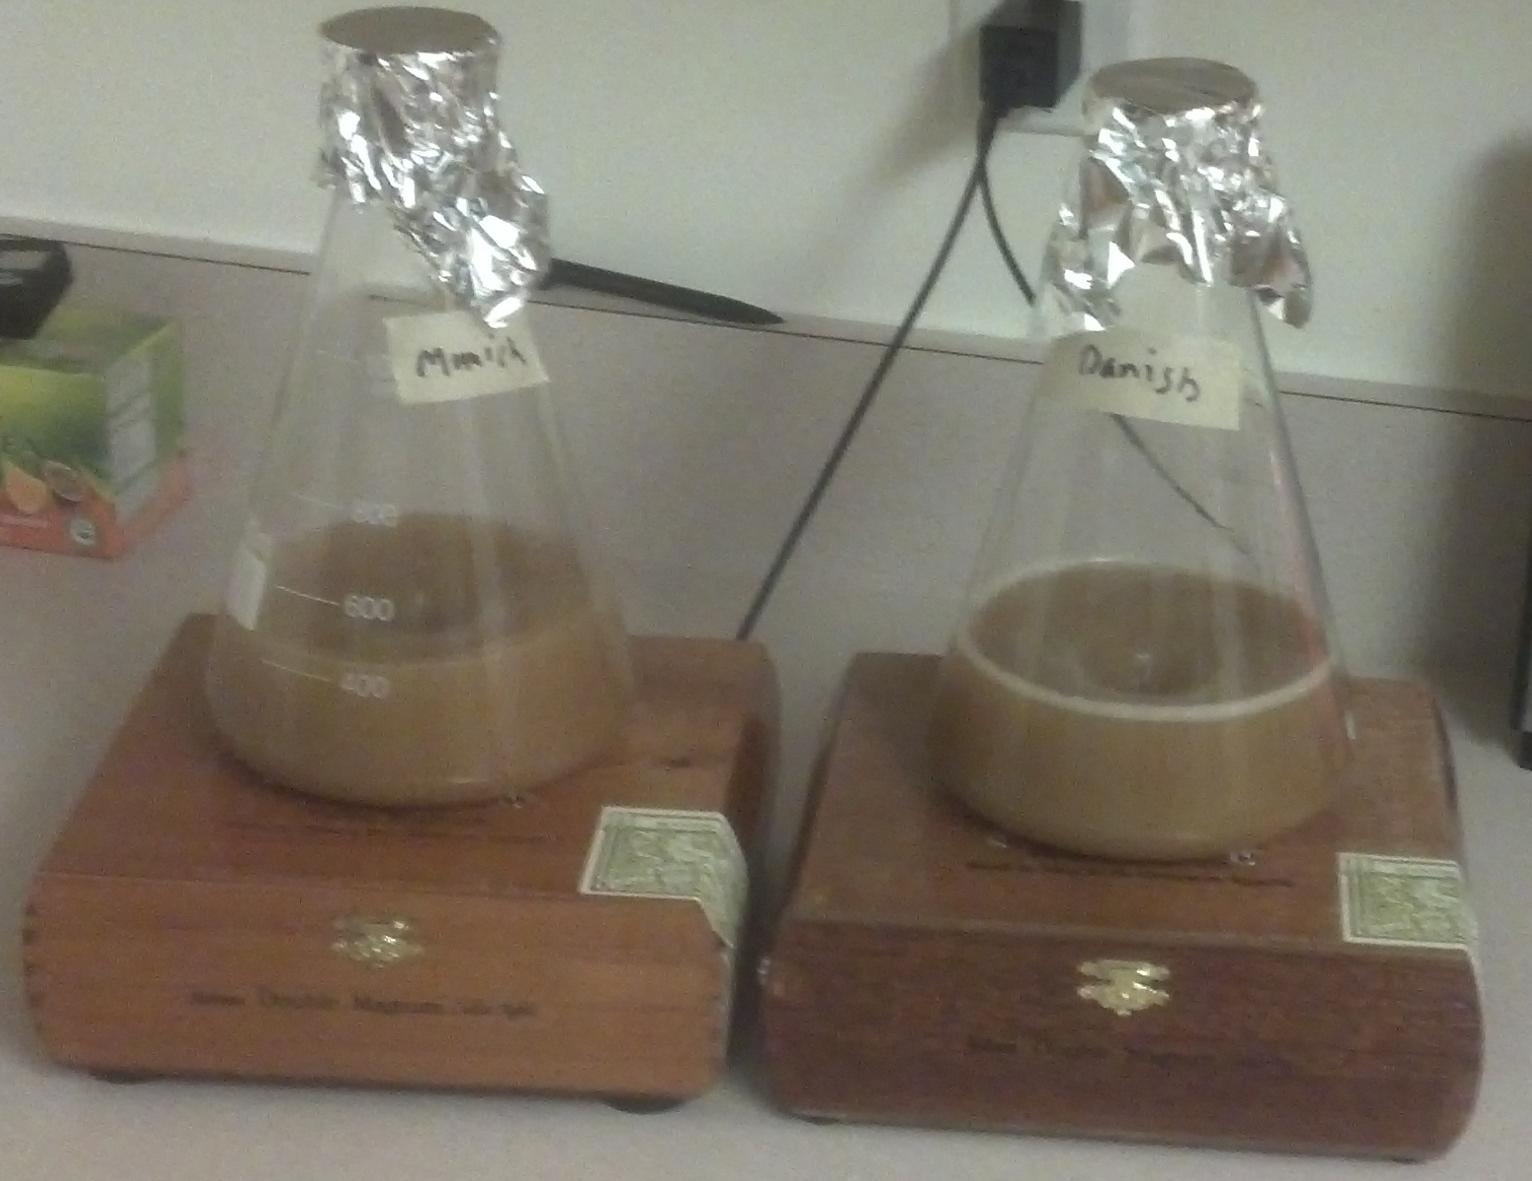
Here is my 5L Stirplate


KIAKillerXJ
Well-Known Member
Made mine out of an ancient external HP HDD enclosure. 5w power, rheostat, 1" stir bar. 4 hard drive magnets stacked on each other. Neither of these pics have a full 5L in them, but it will pull a vortex all the way to the bottom full. Nice and stable since the HDD enclosure is a good size. Look very professional IMO and probably wouldn't realize it was DIY'd if I didnt mention it.


nothing fancy here. lots of good info out there thanks to google. this guy's site helped me the most:
http://biohazardbrewery.wordpress.com/instruments/brewery-stirplate/


looking forward to taking it on its maiden voyage!
Sent from my iPhone using Home Brew
http://biohazardbrewery.wordpress.com/instruments/brewery-stirplate/


looking forward to taking it on its maiden voyage!
Sent from my iPhone using Home Brew
pumpkinman2012
Well-Known Member
- Joined
- Jan 7, 2013
- Messages
- 1,104
- Reaction score
- 149
Used my stir plate for the first time yesterday, worked great! The brew was actively fermenting an hr and a half after I pitched it.
Here is a shot of the stir plate with the plexi-glass cover and PVC legs, not the best looking, but it works well with a 2 liter starter.
.
.
.

Here is a shot of the stir plate with the plexi-glass cover and PVC legs, not the best looking, but it works well with a 2 liter starter.
.
.
.
DualCoreBrewing
Active Member
- Joined
- Oct 3, 2013
- Messages
- 26
- Reaction score
- 3
So my stir plate project started out with finding this crazy-ass UV lamp power supply at the local e-recycler for $5. I liked the footprint, and the steel construction was sturdy.
The unit had a built-in lighted rocker for power and a 1/10 hour timer on the front. They were fed power through a 125V/250V fusable link. Great way to start. (I added the push button and potentiometer, you'll see why later.)
Picture 1
The power originally went from the fuseable link to this sweet power rail. Just repurposed it with hot, neutral, and ground connections.
Picture 2
Off of the 120V rail, I wired in a 24VDC adaptor.
Picture 3
From the 24V adaptor, I hooked up this crazy power supply I ripped out of an old printer I had lying around. I couldn't figure out how to get it to work at first, but then I discovered that it needed to be turned on with an intermittent switch (just like your standard PC), so I added that button on the front. This little power supply has two 24V rails and a dual 12V rail. It also has USB ports, which I intend on finding a purpose for at some point.
Picture 4
From the 12V rail on the power supply, I soldered the hot lead out to the adjustable lead on a potentiometer from an old guitar. I terminated the hot and neutral leads to an old HDD 4-PIN connector so, if I ever needed to, I could simply remove the fan from the bottom assembly.
Picture 5
I had some PVC pipe lying around, so I cut a small chunk and glued it to a 12V fan. I created a little cradle/cross member for mounting the magnets. For the magnets, I had a rare earth magnet on my fridge, but it wasn't enough, so I added some magnets I had from some name badges that I got working some dead-end job years and years ago.
Picture 6
And here it is! Not totally finished (need to fix that gaping hole on the top that I had to cut because magnets don't like to magnetize through solid steel plate). Total out of pocket cost: $10 ($5 for the case, $2 for a fan, and $3 in random connectors).
Video 1

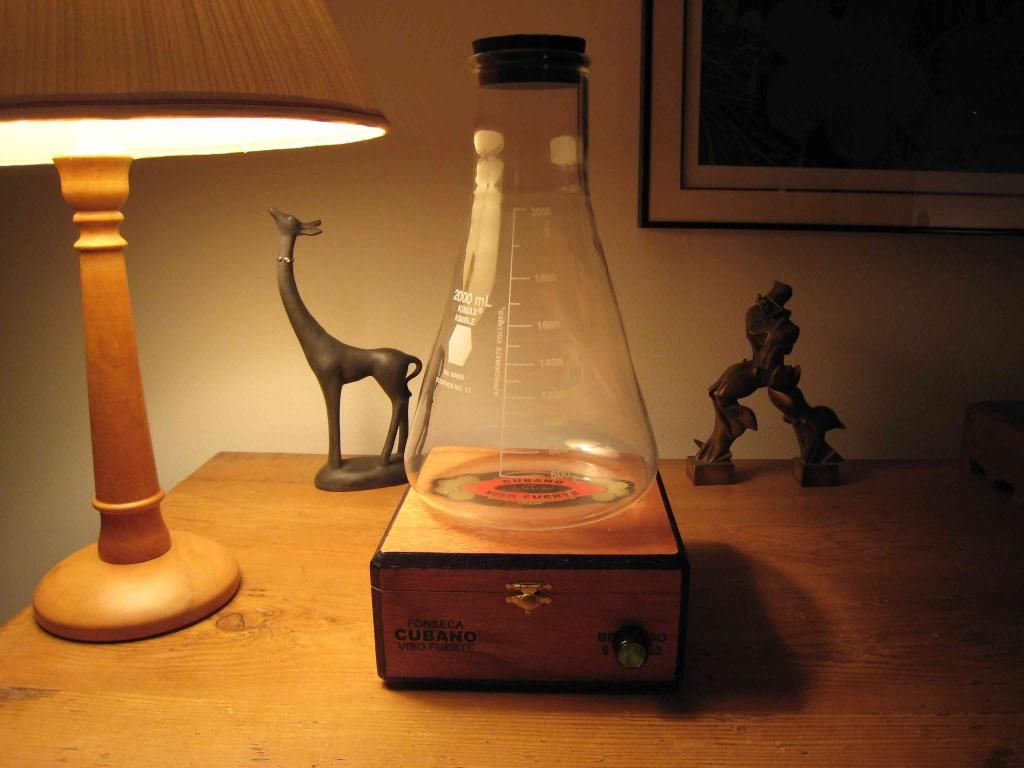
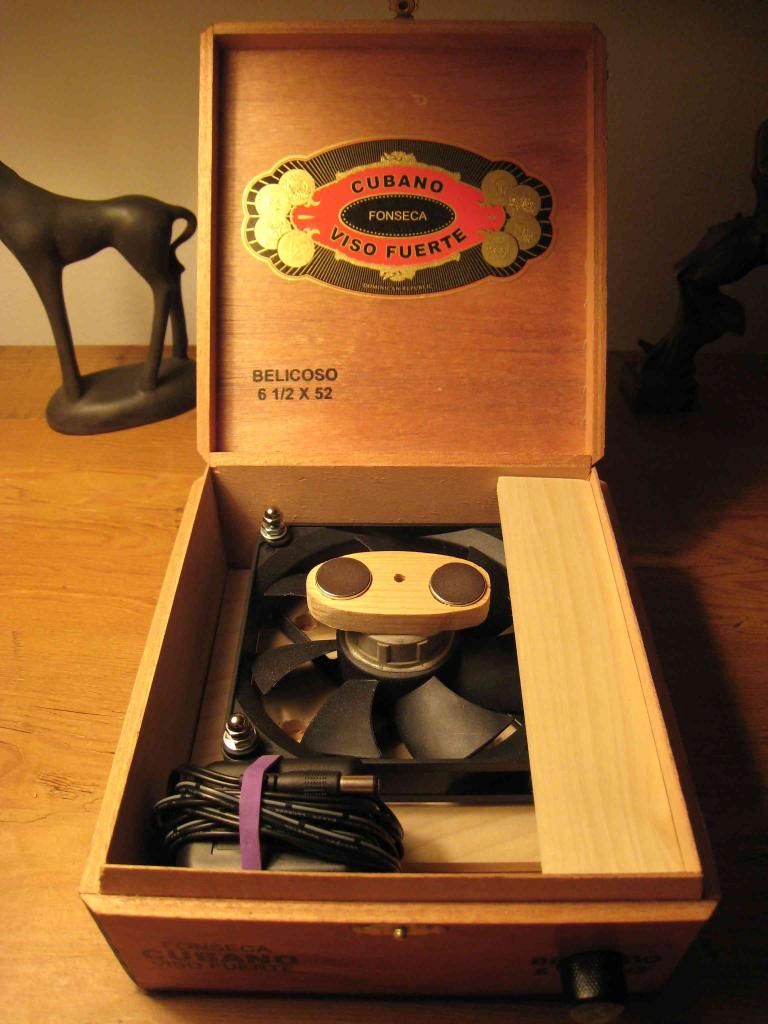
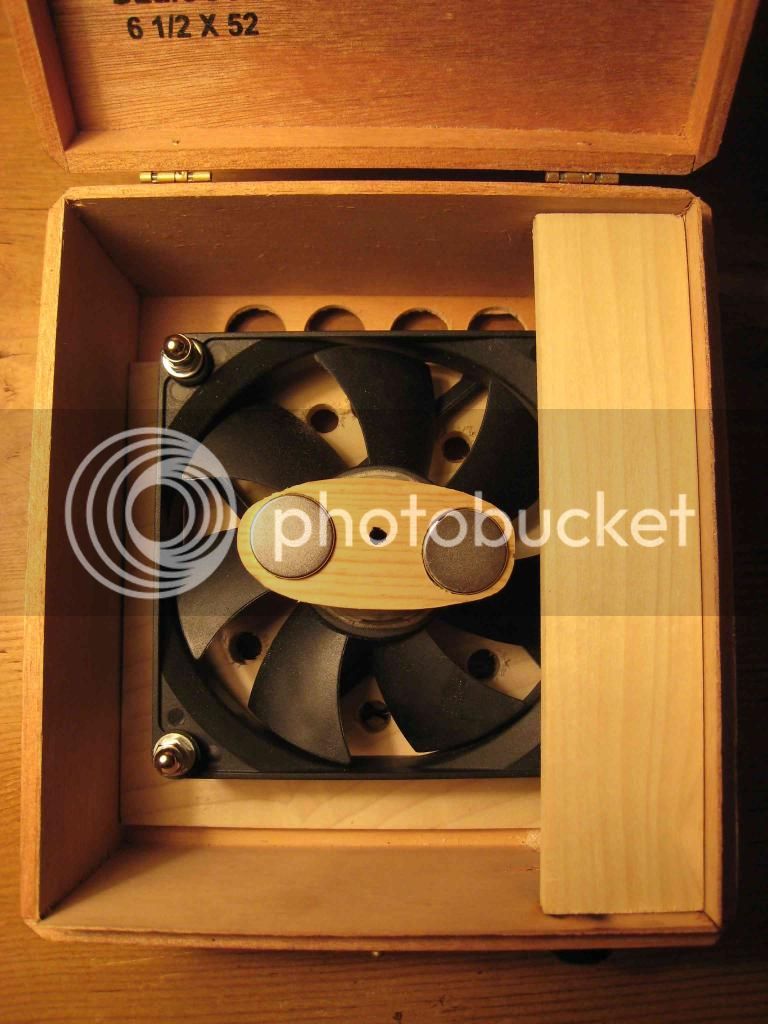
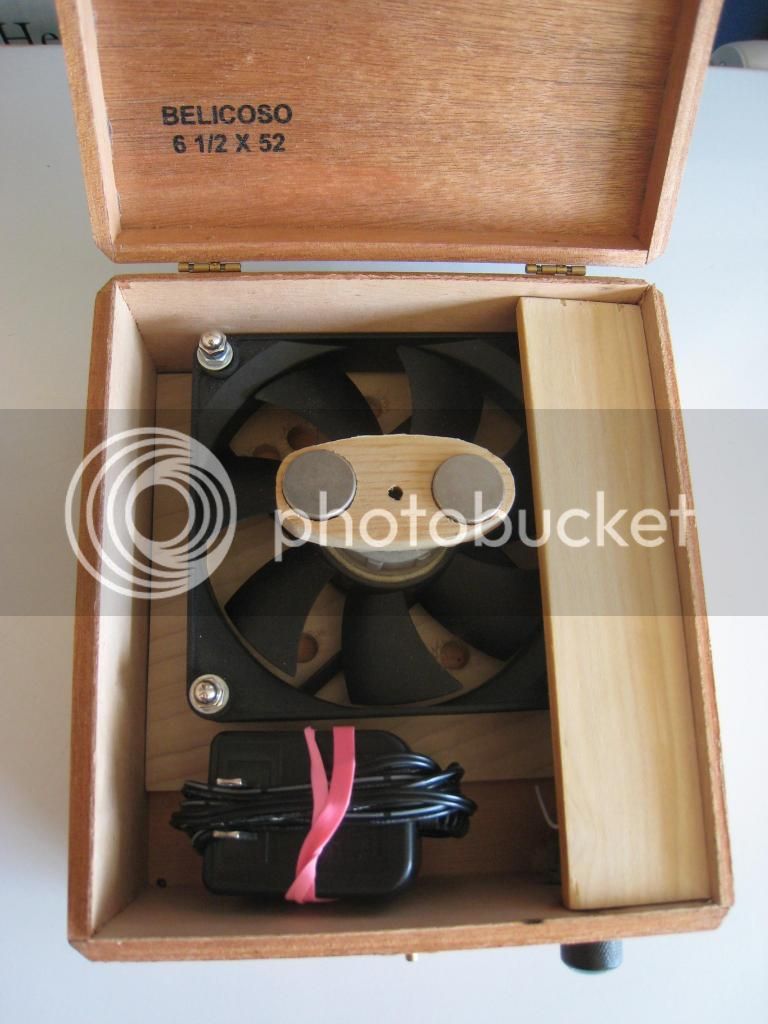
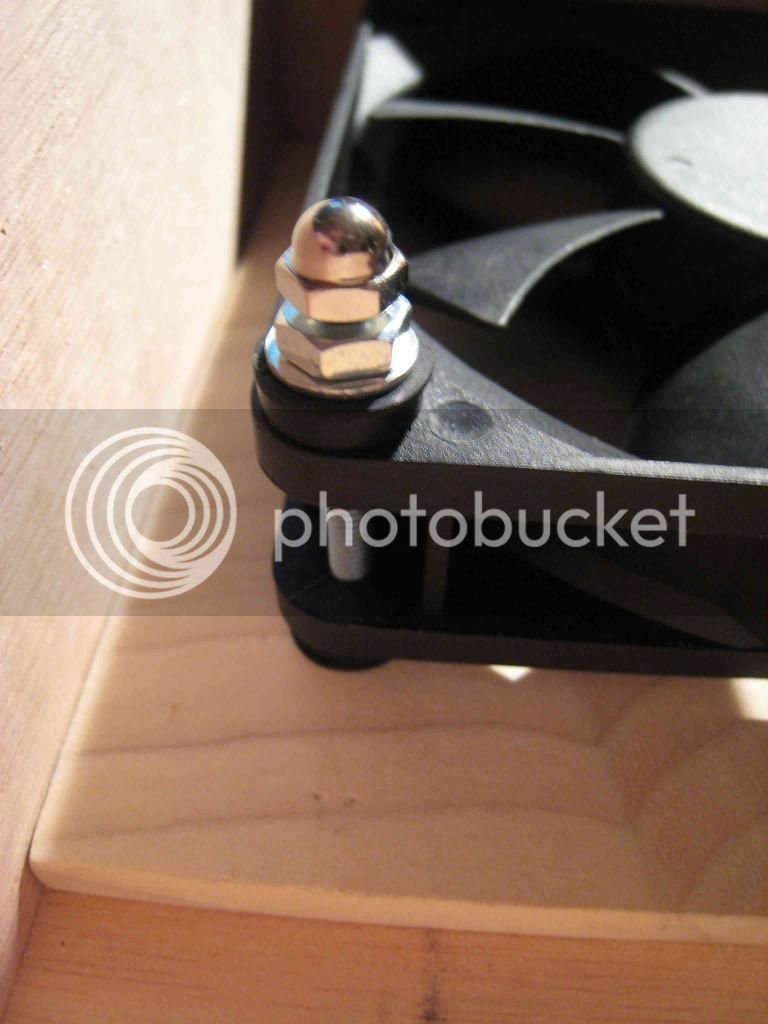
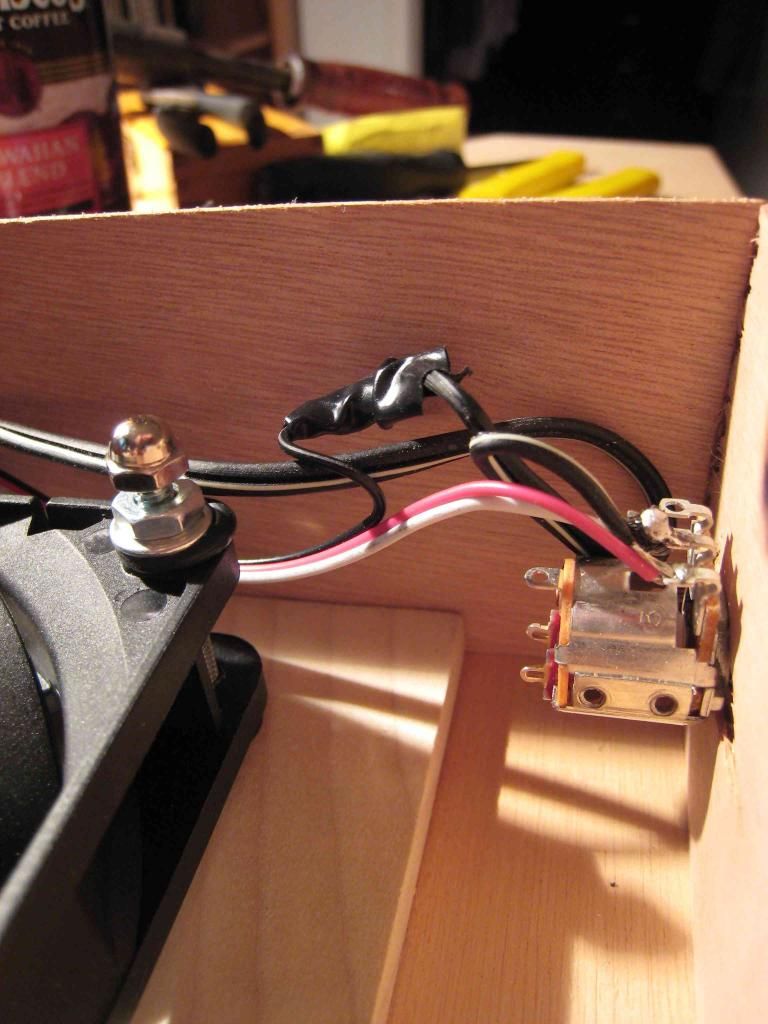
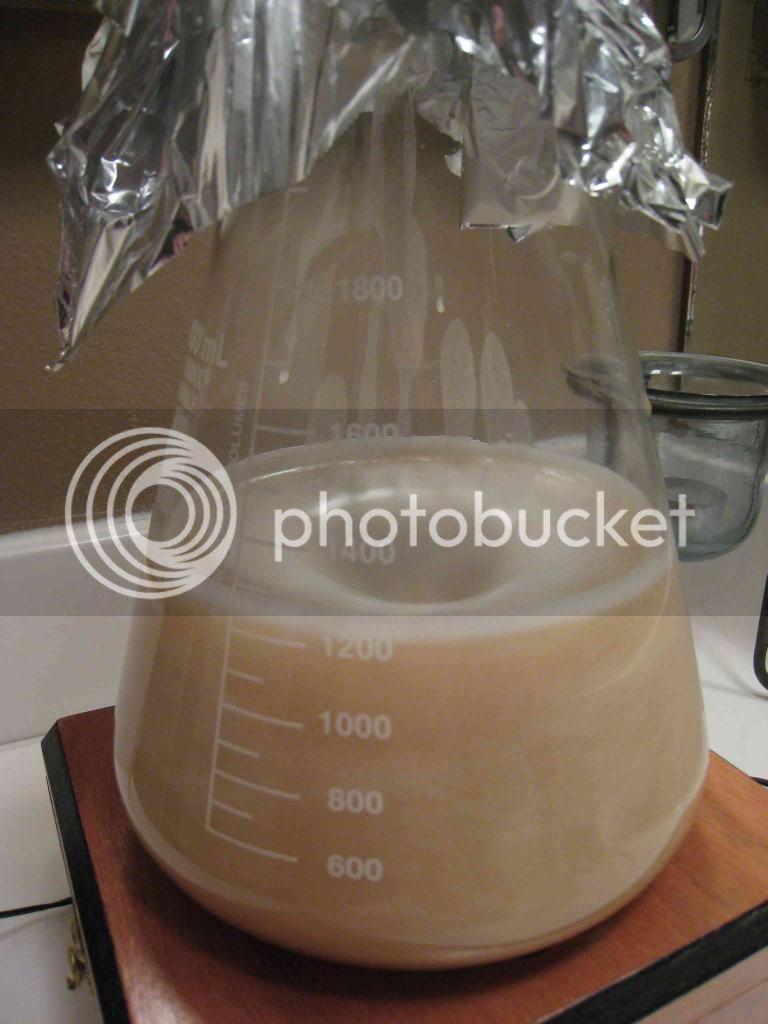
Here's my bog-standard cigar-box model. Using an old 12V wall wart from some computer thing (probably a hub), a case fan from an old computer, a HDD magnet and a volume control pot from who-knows-what. I think RPMs go from 500 on low to maybe 2000 on high, so I'll probably wind up rebuilding it using a PWM circuit at some point, but for now it works!


HarryGrowth
Active Member
Here's mine. Works great and didn't cost a C-note. Easy build and super quiet.
Used jakecpunut youtube video parts list


Used jakecpunut youtube video parts list
HarryGrowth,
Love the foam in the top of your flask, where did you acquire it?
That's called a foam stopper. Here's a link to Austin Homebrew's: http://www.austinhomebrew.com/Beer/Stoppers/Universal-Foam-Stopper.html
ipso
Well-Known Member
I wanted the power brick to fit inside the box to be all self-contained, but the fan was too big. What to do?
I bolted the fan to a piece of poplar wood that slides snugly back and forth. So it can slide up to allow for the power brick.
I also drilled holes on the bottom such that when you take out the power brick and slide the fan down to centered operational position, the holes open up and air pulls in from the center holes and exits via the holes on the bottom in the back, so it's highly ventilated with controlled airflow.
But when you slide the fan back up into the storage position and put the brick in, the box is entirely sealed no holes.
Then just a similar piece of poplar slides in snug to cover the wiring.
Rubber mounts for smooth and silent operation.
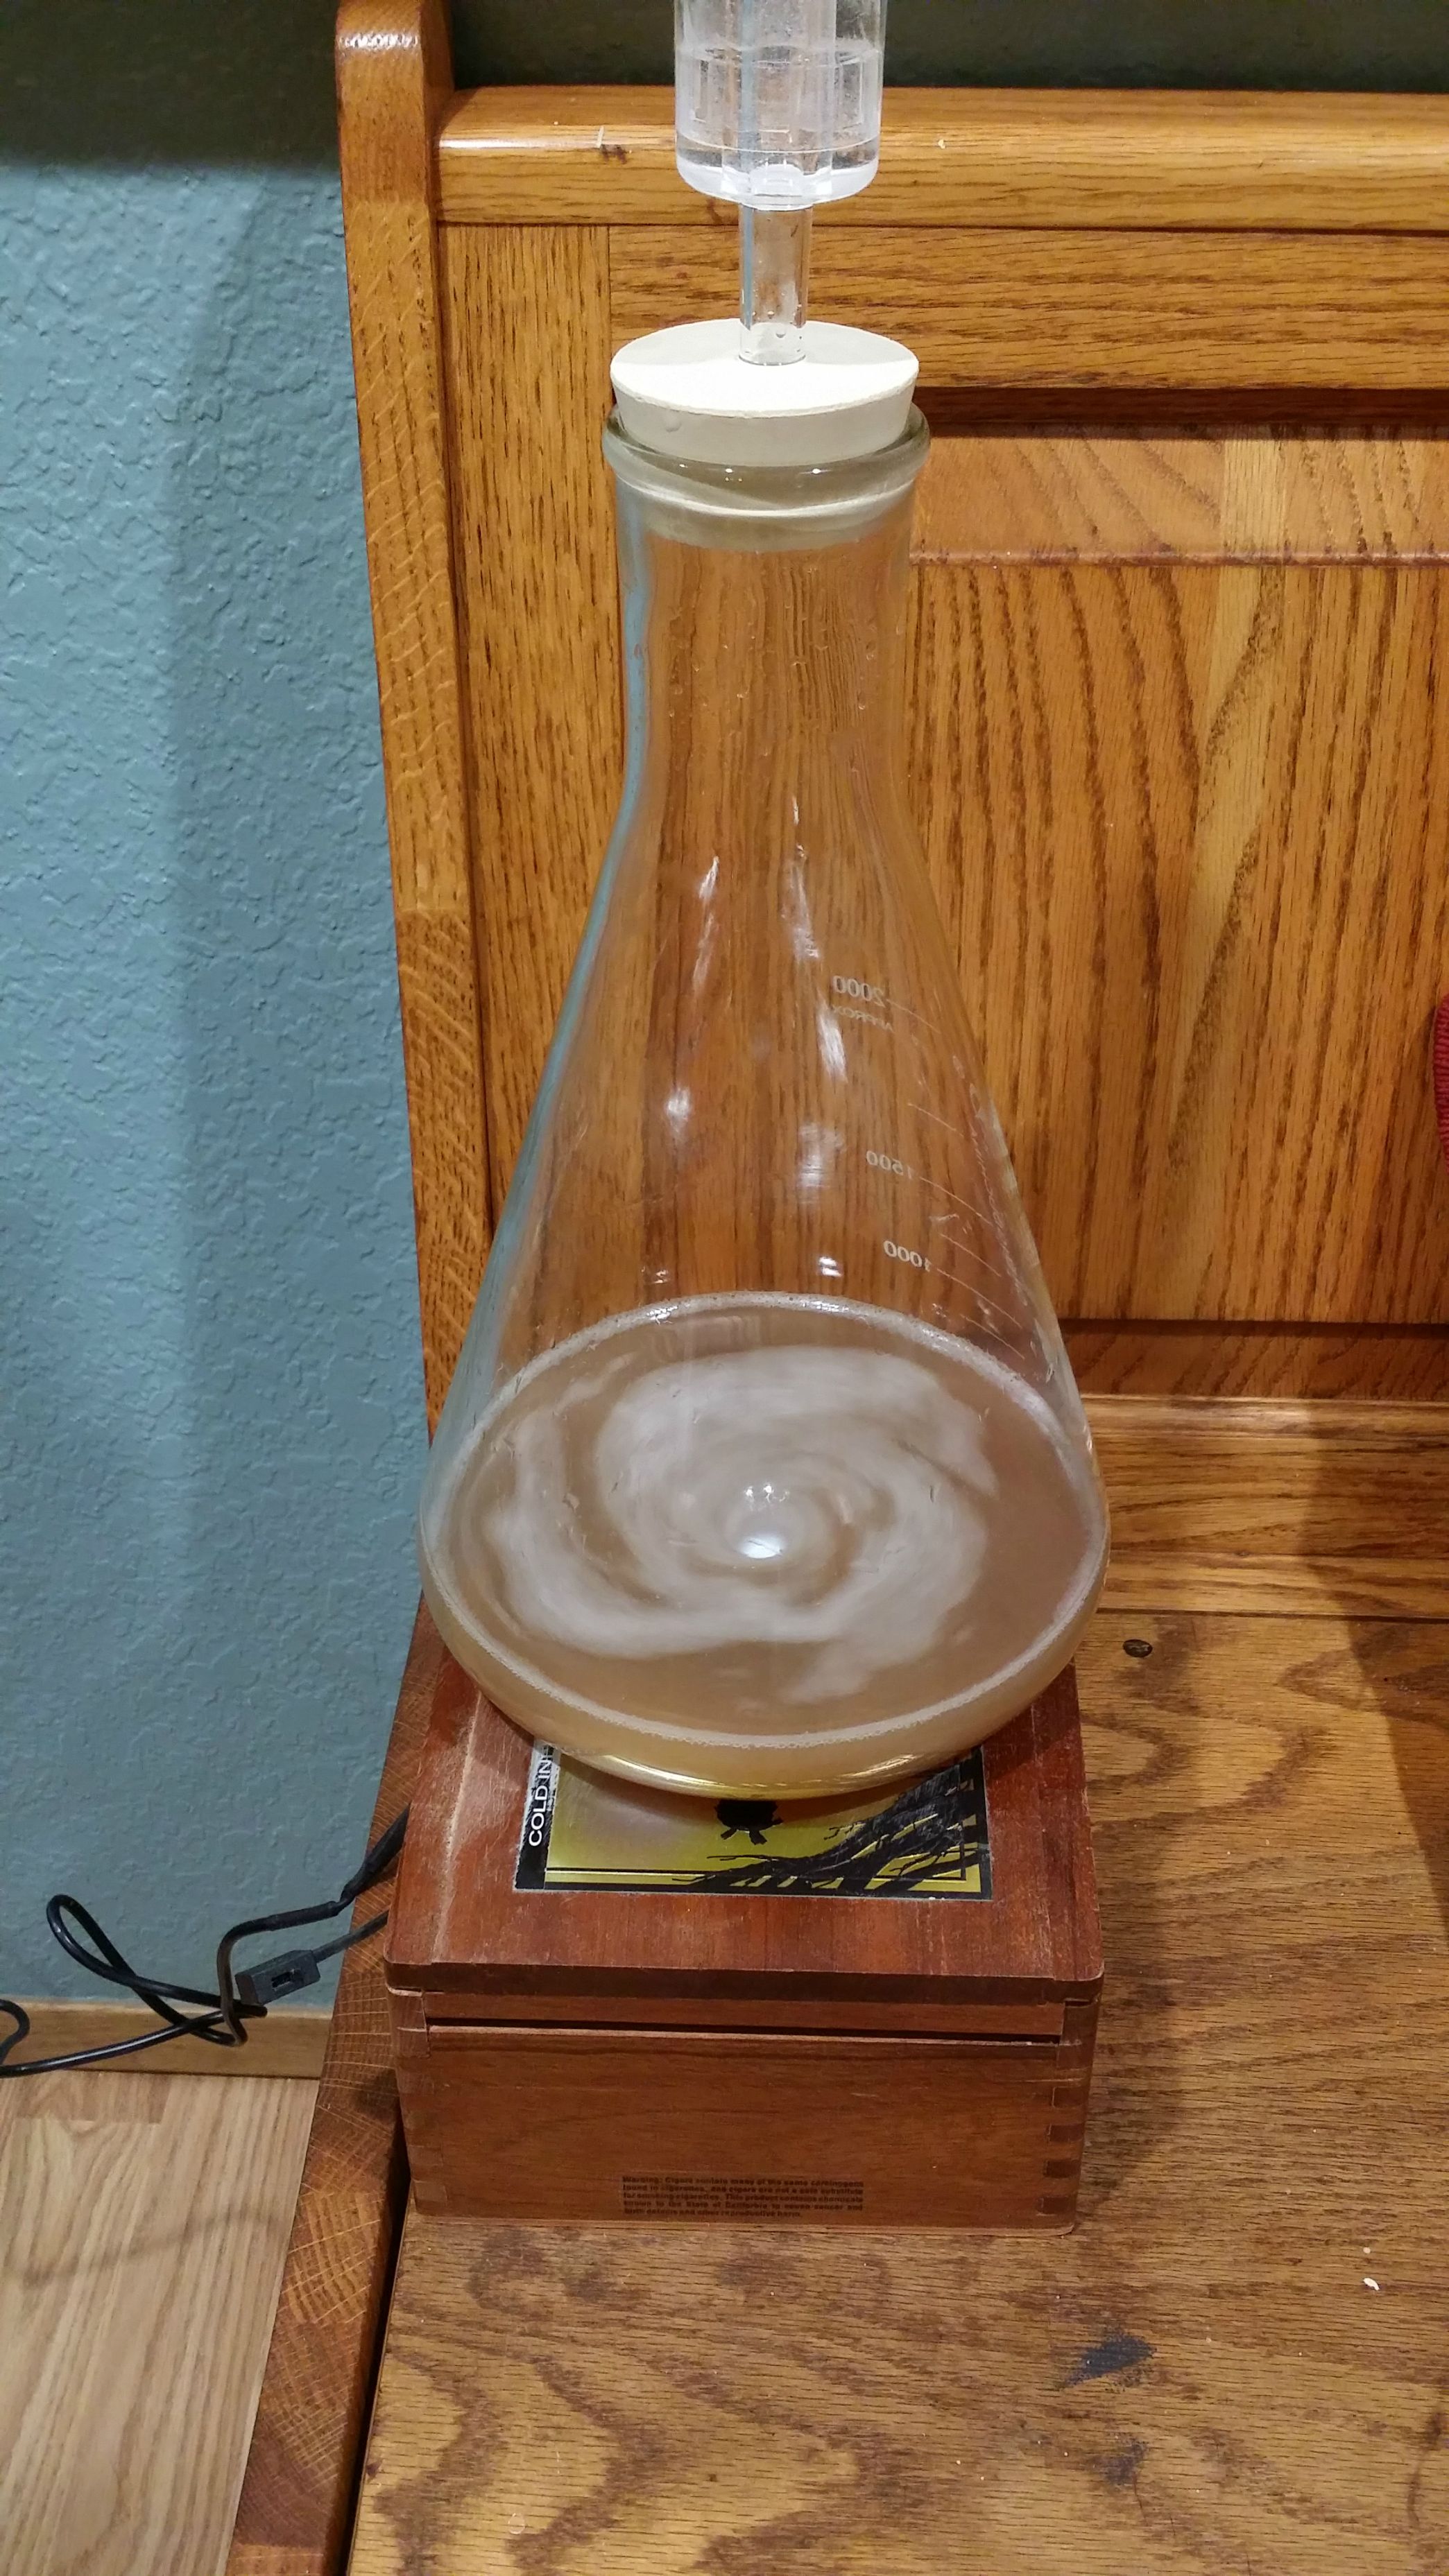
The high-power magnets are stacked two-deep, and spaced exactly for a 2 stir bar. This, it seems to me, is the most important part placing lots of magnets exactly right to keep the stir-bar tight.
I sunk them in wood as my best way to secure them, then just epoxied that to a hollow PVC pipe fitting. Originally I had the pipe fitting as a two-part threaded number such that I could easily unscrew and swap out different magnets housings to accommodate different stir bar lengths, but that's just showing off. ; )
I keep the flask & stopper on it to serve as homebrew art!
Thought I would share the simple design here. I made this up out of the blue to solve the space problem. Anyone ever see anything like this before? Nothing new under the sun and all.
(Selling her on eBay right now along with all of my equipment. Moving overseas. Thought I would share the idea before she is gone.)
I bolted the fan to a piece of poplar wood that slides snugly back and forth. So it can slide up to allow for the power brick.
I also drilled holes on the bottom such that when you take out the power brick and slide the fan down to centered operational position, the holes open up and air pulls in from the center holes and exits via the holes on the bottom in the back, so it's highly ventilated with controlled airflow.
But when you slide the fan back up into the storage position and put the brick in, the box is entirely sealed no holes.
Then just a similar piece of poplar slides in snug to cover the wiring.
Rubber mounts for smooth and silent operation.
The high-power magnets are stacked two-deep, and spaced exactly for a 2 stir bar. This, it seems to me, is the most important part placing lots of magnets exactly right to keep the stir-bar tight.
I sunk them in wood as my best way to secure them, then just epoxied that to a hollow PVC pipe fitting. Originally I had the pipe fitting as a two-part threaded number such that I could easily unscrew and swap out different magnets housings to accommodate different stir bar lengths, but that's just showing off. ; )
I keep the flask & stopper on it to serve as homebrew art!
Thought I would share the simple design here. I made this up out of the blue to solve the space problem. Anyone ever see anything like this before? Nothing new under the sun and all.
(Selling her on eBay right now along with all of my equipment. Moving overseas. Thought I would share the idea before she is gone.)
grrickar
Well-Known Member
Here's mine I recently built. Project box from Radio Shack, 25k pot from there as well, along with lighted switch. 80mm Rosewill computer fan, two HDD magnets attached to a fender washer glued on top of the motor assembly, blades of fan have been removed.

Mine finally working with my new flask and 1"stir bar
The dog fish cap has a round earth magnet in it as a holder for my stir bars when not in use I have a 2" being held on the bottom side of the top of my plate
View attachment ImageUploadedByHome Brew1420059478.572185.jpg
Slow using speed
View attachment ImageUploadedByHome Brew1420059698.249247.jpg
Just for fun half speed
View attachment ImageUploadedByHome Brew1420059598.455690.jpg
Took a vid of full speed but don't have a way to upload it no throwing at any speed I'm excited maiden voyage is tomorrow evening with some San Diego super yeast

n240sxguy
Well-Known Member
My repurposed mac mini. Turbocharged.
That's gotta be the most expensive stir plate ever.
IronLion409
Well-Known Member
First prototype ....

Westermans
Well-Known Member
- Joined
- Jan 3, 2015
- Messages
- 87
- Reaction score
- 23
Westermans
Well-Known Member
- Joined
- Jan 3, 2015
- Messages
- 87
- Reaction score
- 23
Finished product View attachment ImageUploadedByHome Brew1420861903.208353.jpg
zgreenside
Active Member
- Joined
- Jan 4, 2014
- Messages
- 42
- Reaction score
- 1
Never wanted to spend the $45-100 on a stir plate when I could just use a growler and shake it every few hours or when I could, but you guys have inspired me!
Parts list:
Cigar Box - $1
PC Fan - Free (Perks of working in IT)
Magnet - Free (Again )
)
AC/DC Adapter - $9 (didn't know a cell phone charger would work...probably could've saved a few bucks)
Super glue - $4
Bolts #6-32 + nuts and washers - $2
I need to get some more pictures of it, but here it is:
I think I'm going to make another one soon, this time pay more attention and properly line up the fan to be dead center, and use a cell phone charger instead so that I can save the extra $9 for another yeast pack.
Parts list:
Cigar Box - $1
PC Fan - Free (Perks of working in IT)
Magnet - Free (Again
)AC/DC Adapter - $9 (didn't know a cell phone charger would work...probably could've saved a few bucks)
Super glue - $4
Bolts #6-32 + nuts and washers - $2
I need to get some more pictures of it, but here it is:
I think I'm going to make another one soon, this time pay more attention and properly line up the fan to be dead center, and use a cell phone charger instead so that I can save the extra $9 for another yeast pack.
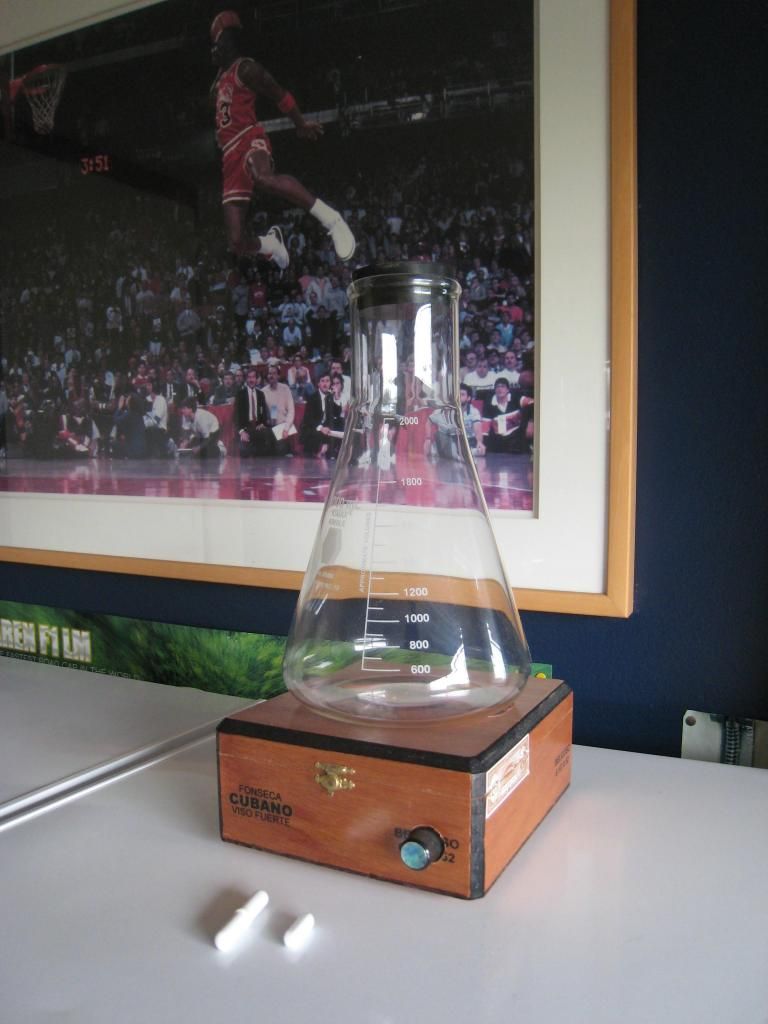
Another cigar box. Parts totaled about $10.
View attachment ImageUploadedByHome Brew1421364733.486982.jpg
View attachment ImageUploadedByHome Brew1421364733.486982.jpg
Browningbuck
Well-Known Member
- Joined
- Nov 27, 2014
- Messages
- 132
- Reaction score
- 48
Trying a few different magnets


View attachment ImageUploadedByHome Brew1421572434.075408.jpg
View attachment ImageUploadedByHome Brew1421572459.731457.jpg
View attachment ImageUploadedByHome Brew1421572533.436405.jpg
http://youtu.be/dkctBl9maj8
Very happy with this, I'm far from electrically inclined so it was a learning curve. Still need to solder the connections.
View attachment ImageUploadedByHome Brew1421572459.731457.jpg
View attachment ImageUploadedByHome Brew1421572533.436405.jpg
http://youtu.be/dkctBl9maj8
Very happy with this, I'm far from electrically inclined so it was a learning curve. Still need to solder the connections.
Similar threads
- Replies
- 14
- Views
- 1K
- Replies
- 0
- Views
- 465
- Replies
- 3
- Views
- 1K
- Replies
- 3
- Views
- 709
